HTML Image Tag
The img tag of HTML is used for the webpage display. The HTML img tag is an empty tag which contains just attributes, the HTML image element does not use the closing tags.
Example:
<!DOCTYPE>
<html>
<body>
<h2>HTML Image Example</h2>
<img src="http://ukacademe.com/UK-Academe-Logo.png" alt="Uttarakhand, a state in northern India."/>
</body>
</html>
Output:
HTML Image Example
![]()
HTML Images Syntax
The <img> tag is used to define images in HTML.
The src attribute specifies the URL (web address) of the image:
<img src="url">
The alt Attribute
If for a cause the User does not see the image (due to slow connection, an error in the src attribute or when we are using a screen reader), the alt attribute provides an alternative text for the image.
Image should be described by the alt attribute value:
<img src="http://ukacademe.com/UK-Academe-Logo.png" alt="Uttarakhand, a state in northern India.">
Example:
<!DOCTYPE html>
<html>
<body>
<h2>Alternative text</h2>
<p>The alt attribute should reflect the content of the image so that users who can not see the image will know what the image contains:</p>
<img src="http://ukacademe.com/UK-Academe-Logo.png" alt="Uttarakhand, a state in northern India." width="260" height="195">
</body>
</html>
Output:
Alternative text
The alt attribute should reflect the content of the image so that users who can not see the image will know what the image contains:
![]()
If an image can not be found in a browser, the alt attribute value will show:
Example:
<!DOCTYPE html>
<html>
<body>
<p>If a browser cannot find the image, it will display the alternate text:</p>
<img src="http://ukacademe.com/UK-Academe-Logo.jpg" alt="Uttarakhand, a state in northern India.">
</body>
</html>
Output:
If a browser cannot find the image, it will display the alternate text:
![]()
Remember Point: We will need the alt attribute. Without it a web page will not properly validate.
Image Size - Width and Height
It is an optional attribute used to indicate the width or height of the image or to show both. We can also use CSS instead of the attribute width and/or height.
We can use the attributes width and height to specify the image size:
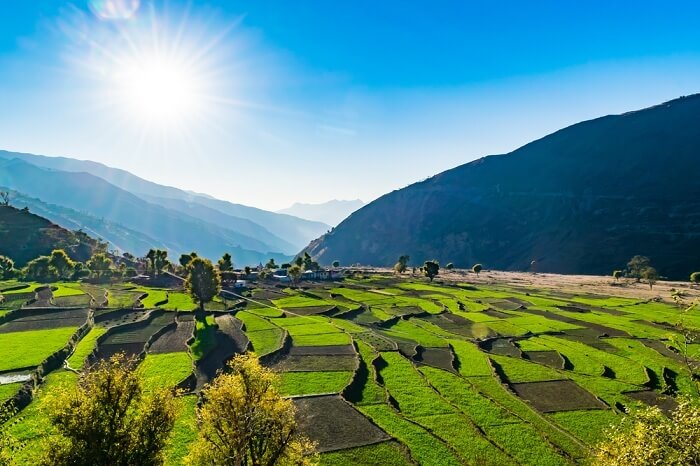
<img src="http://ukacademe.com/Areas/WebDevelopment/Images/Uttarakhand.jpg" alt="Uttarakhand Hills" width="500" height="600">
Example:
<!DOCTYPE html>
<html>
<body>
<h2>Image Size</h2>
<p>In this example, we specify the width and height of an image with the width and height attributes:</p>
<img src="http://ukacademe.com/Areas/WebDevelopment/Images/Uttarakhand.jpg" alt="Uttarakhand Hills" width="300" height="359">
</body>
</html>
Output:
Image Size
In this example, we specify the width and height of an image with the width and height attributes:
Alternatively, The style attribute can be used to specify the height and width of an image.
<img src="http://ukacademe.com/Areas/WebDevelopment/Images/Uttarakhand.jpg" alt="Uttarakhand Hills" style="width:500px;height:600px;">
Example:
<!DOCTYPE html>
<html>
<body>
<h2>Image Size</h2>
<p>Use the style attribute to specify the width and height of an image:</p>
<img src="http://ukacademe.com/Areas/WebDevelopment/Images/Uttarakhand.jpg" alt="Uttarakhand Hills" style="width:300px;height:359px;">
</body>
</html>
Output:
Image Size
Use the style attribute to specify the width and height of an image:
Attributes of width and height always define the pixel width and height of the image.
Remember Point: Specify image width and height at all times. If height and width are not indicated, the page may flicker during loads of the image.
Animated Image
HTML allows animated GIF(Graphics Interchange Format) image
Example:
<!DOCTYPE html>
<html>
<body>
<h2>Animated Images</h2>
<p>The GIF standard allows moving images.</p>
<img src="http://ukacademe.com/Typing.gif" alt="Computer man" style="width:107px;height:98px;">
</body>
</html>
Output:
Animated Images
The GIF standard allows moving images.

Image Floating
Use the CSS float property to let the image float to the right or to the left of a text:
Exmple:
<!DOCTYPE html>
<html>
<body>
<h2>Floating Images</h2>
<p><strong>Float the image to the right:</strong></p>
<p><img src="http://ukacademe.com/Typing.gif" alt="Computer man" style="float:right;width:107px;height:98px;">
A floating picture paragraph. A floating picture paragraph. A floating picture paragraph.
</p>
<p><strong>Float the image to the left:</strong></p>
<p>
<img src="http://ukacademe.com/Typing.gif" alt="Computer man" style="float:left;width:107px;height:98px;">
A floating picture paragraph. A floating picture paragraph. A floating picture paragraph.
</p>
</body>
</html>
Output:
Floating Images
Float the image to the right:
A floating picture paragraph. A floating picture paragraph. A floating picture paragraph.
Float the image to the left:
A floating picture paragraph. A floating picture paragraph. A floating picture paragraph.
Image Maps
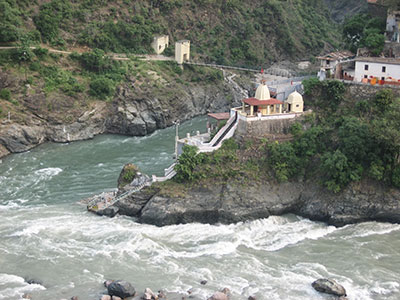
The <map> tag sets a picture map. A picture map is a clickable image area. Click on the river Alaknanda and on the river Mandakini in the picture below.
Click on the Alaknanda River, and Mandakini River to go to a new page and read more about the topic:
Example:
<!DOCTYPE html>
<html>
<body>
<h2>Image Maps</h2>
<p>Click on the Alaknanda River, and Mandakini River to go to a new page and read more about the topic:</p>
<img src="https://ukacademe.com/Areas/WebDevelopment/Images/Rudraprayag_Sangam.JPG" usemap="#image-map">
<map name="image-map">
<area target="_blank" alt="Mandakini River" title="Mandakini River" href="https://en.wikipedia.org/wiki/Mandakini_River" coords="3,236,107,216,287,211,400,224,400,298,3,299,1,263" shape="poly">
<area target="_blank" alt="Alaknanda River" title="Alaknanda River" href="https://en.wikipedia.org/wiki/Alaknanda_River" coords="1,159,105,132,205,113,166,166,89,208,1,226" shape="poly">
</map>
</body>
</html>
The <map> name attribute is associated with the <img> attribute of the user map and creates the connection between the image and the map.
The element <map> contains a number of <area> tags, which define the image's clickable areas.
Background Image
Use the CSS property background image to add a background image for a HTML element:
Specify the background image property of the P element to add a background image to a paragraph:
<body>
<p style="background-image:url('http://ukacademe.com/Areas/WebDevelopment/Images/Uttarakhand.jpg');">
</p>
</body>
Example:
<!DOCTYPE html>
<html>
<body>
<h2>Background Image</h2>
<p style="background-image:url('http://ukacademe.com/Areas/WebDevelopment/Images/Uttarakhand.jpg');">
For any visible HTML element, we can specify background images.<br>
The background image for this paragraph is given in this example.<br>
The background image will default to repeat in thedirection(s)<br>
where it is smaller than the specified element.<br>
(Try to resize our browser to see how we comply<br>
with the background image).
</p>
</body>
</html>
Output:
Background Image
For any visible HTML element, we can specify background images.
The background image for this paragraph is given in this example.
The background image will default to repeat in thedirection(s)
where it is smaller than the specified element.
(Try to resize our browser to see how we comply
with the background image).
In addition, specify the background image property on the BODY element to add a background image on a web page:
<body style="background-image:url('http://ukacademe.com/Areas/WebDevelopment/Images/Uttarakhand.jpg');">
<h2>Background Image</h2>
</body>
Example:
<!DOCTYPE html>
<html>
<body style="background-image:url('http://ukacademe.com/Areas/WebDevelopment/Images/Uttarakhand.jpg');">
<h2>Background Image</h2>
<p>If it is smaller than the element where the background picture is specified, the BODY element will default to repeat itself.</p>
</body>
</html>
The <picture> Element
In order to specify more flexibility, HTML5 introduced the <picture> element.
The <picture> element contains a number of elements <source>, each of which refers to different sources of image. This allows the browser to select the picture most suitable for the current view and/or device.
Each <source> element has attributes that describe the most appropriate image. The first <source> item with the matching attribute values is used for the browser and all <source> elements are ignored.
<picture>
<source media="(min-width: 650px)" srcset="http://ukacademe.com/Areas/WebDevelopment/Images/Yamunotri.jpg">
<source media="(min-width: 465px)" srcset="http://ukacademe.com/Areas/WebDevelopment/Images/Kedarnath.jpg">
<img src="http://ukacademe.com/Areas/WebDevelopment/Images/Gangotri.jpg" alt="Gangotri Temple" style="width:auto;">
</picture>
Example:
Display an image if there is at least 650 pixels in the browser window, and another image but larger than 465 pixels if not.
<!DOCTYPE html>
<html>
<head>
<meta name="viewport" content="width=device-width, initial-scale=1.0"></head><body>
<h2>The picture Element</h2>
<picture>
<source media="(min-width: 650px)" srcset="http://ukacademe.com/Areas/WebDevelopment/Images/Yamunotri.jpg">
<source media="(min-width: 465px)" srcset="http://ukacademe.com/Areas/WebDevelopment/Images/Kedarnath.jpg">
<img src="http://ukacademe.com/Areas/WebDevelopment/Images/Gangotri.jpg" alt="Gangotri Temple" style="width:auto;">
</picture>
<p>The browser is resized to display different versions of the loading image at different view size.
The browser searches for the first source element in which the media query matches the current viewport width of the user and searches for the image in the srcset attribute.</p>
<p>As the last child tag in the picture declaration block the img element is required.
The img element is used to back up browsers that are not supporting the picture element or if neither of the source tags matches.
</p>
<p><strong>Note:</strong> The picture element is not supported in IE12 and earlier or Safari 9.0 and earlier.</p>
</body>
</html>
HTML Screen Readers
A screen reader is a software that reads the HTML, converts the text and makes it possible for the user to "hear" the content. Screen readers are helpful for persons with disabilities in their vision or learning.